How to create an Experience Cloud (LWR and Aura) CI/CD with Hutte
Creating an Experience Cloud site in Salesforce generates significant metadata, which can be confusing when deploying the site to a higher environment. This raises the question: "What do we need to deploy, and how do we deploy it?" The answer is simple!
Harald is the Co-Founder of Hutte, bringing his vision of no-code DevOps to life. His passion enables teams and individuals to focus on what matters most – bringing value to the users they build for.
Manuel Moya Ferrer is a highly skilled freelancer who serves as a technical architect, developer, and DevOps engineer. He specializes in Salesforce solutions, covering all technical aspects of their development lifecycle.
Article highlights
When deploying an Experience Cloud site, use a Git-based strategy with the Metadata API for seamless integration and efficient change tracking.
Hutte offers an excellent UI/UX for managing Salesforce deployments. The recipes reference detailed Salesforce documentation to clarify deployment steps.
Detailed recipes are provided for deploying sites using both Lightning Web Runtime (LWR) and Aura frameworks, including GitHub setup, metadata tracking, and automated deployment processes.
As with any other metadata, it's recommended to use a Git-based strategy with the Metadata API for deployment. To make this process easier, Hutte provides an excellent UI and UX. As Salesforce offers detailed documentation to help users understand what needs to be deployed, these recipes will reference this documentation.
Due to differences in the steps required depending on whether your Experience Cloud site is Lightning Web Runtime (LWR) or Aura, we have created two step-by-step recipes. Refer to the steps that are applicable to you.
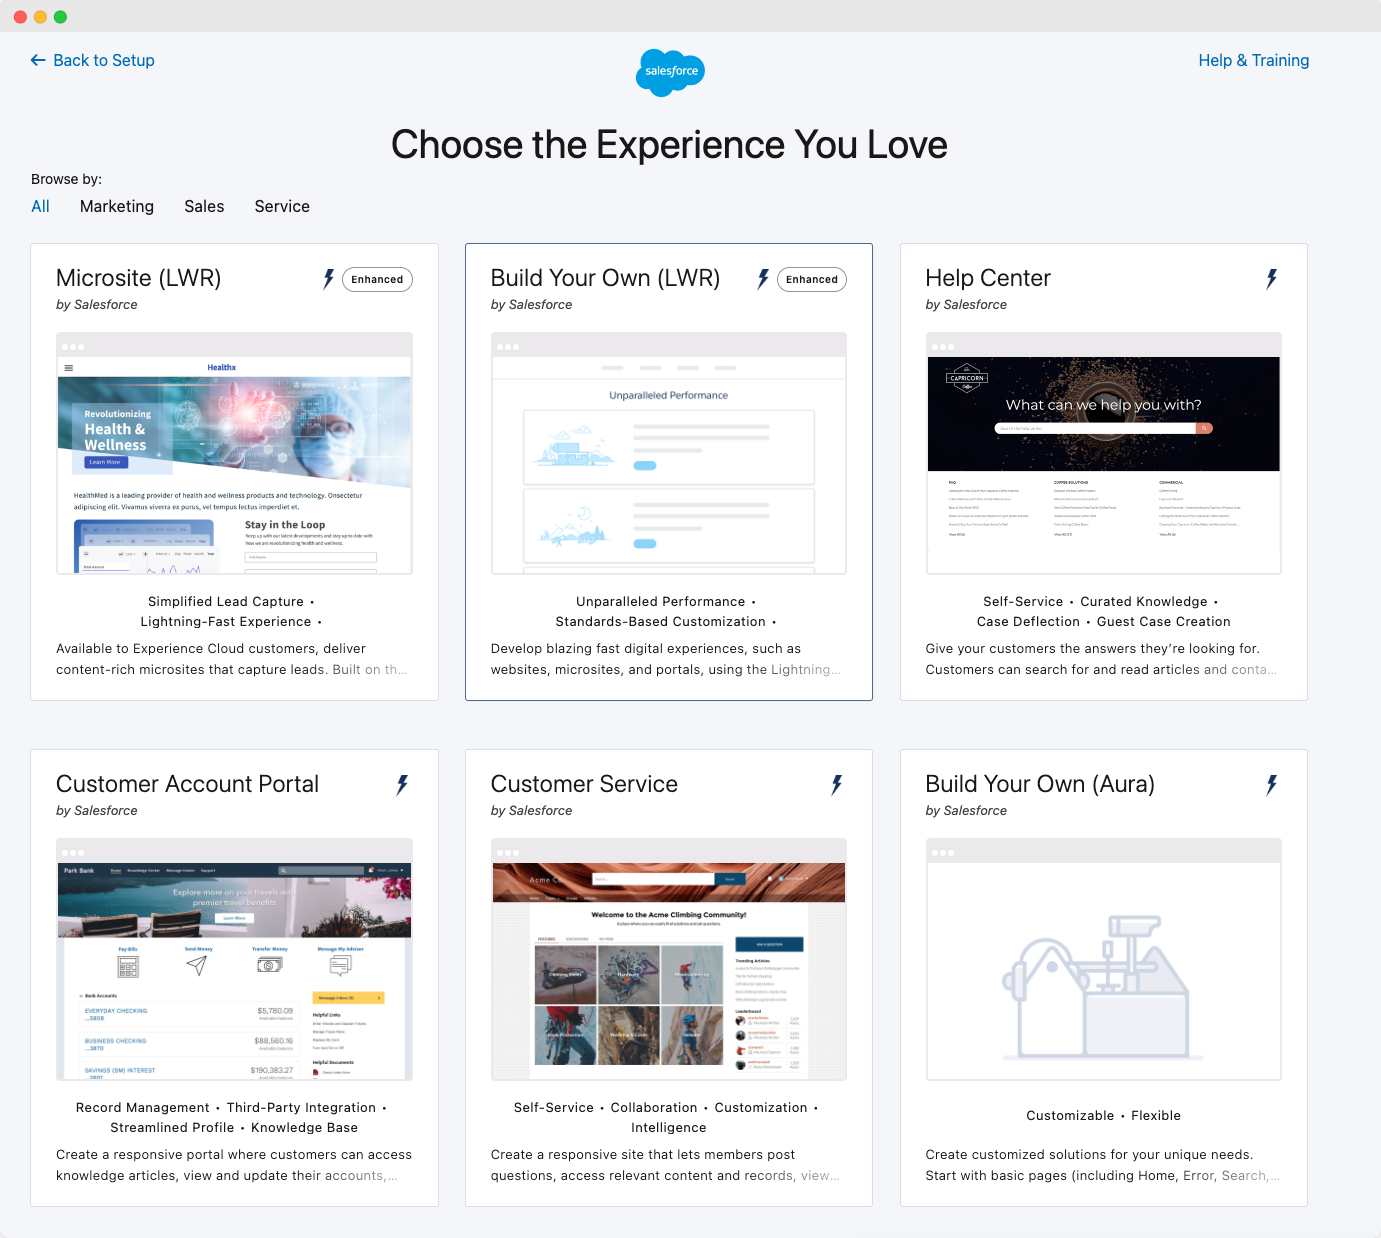
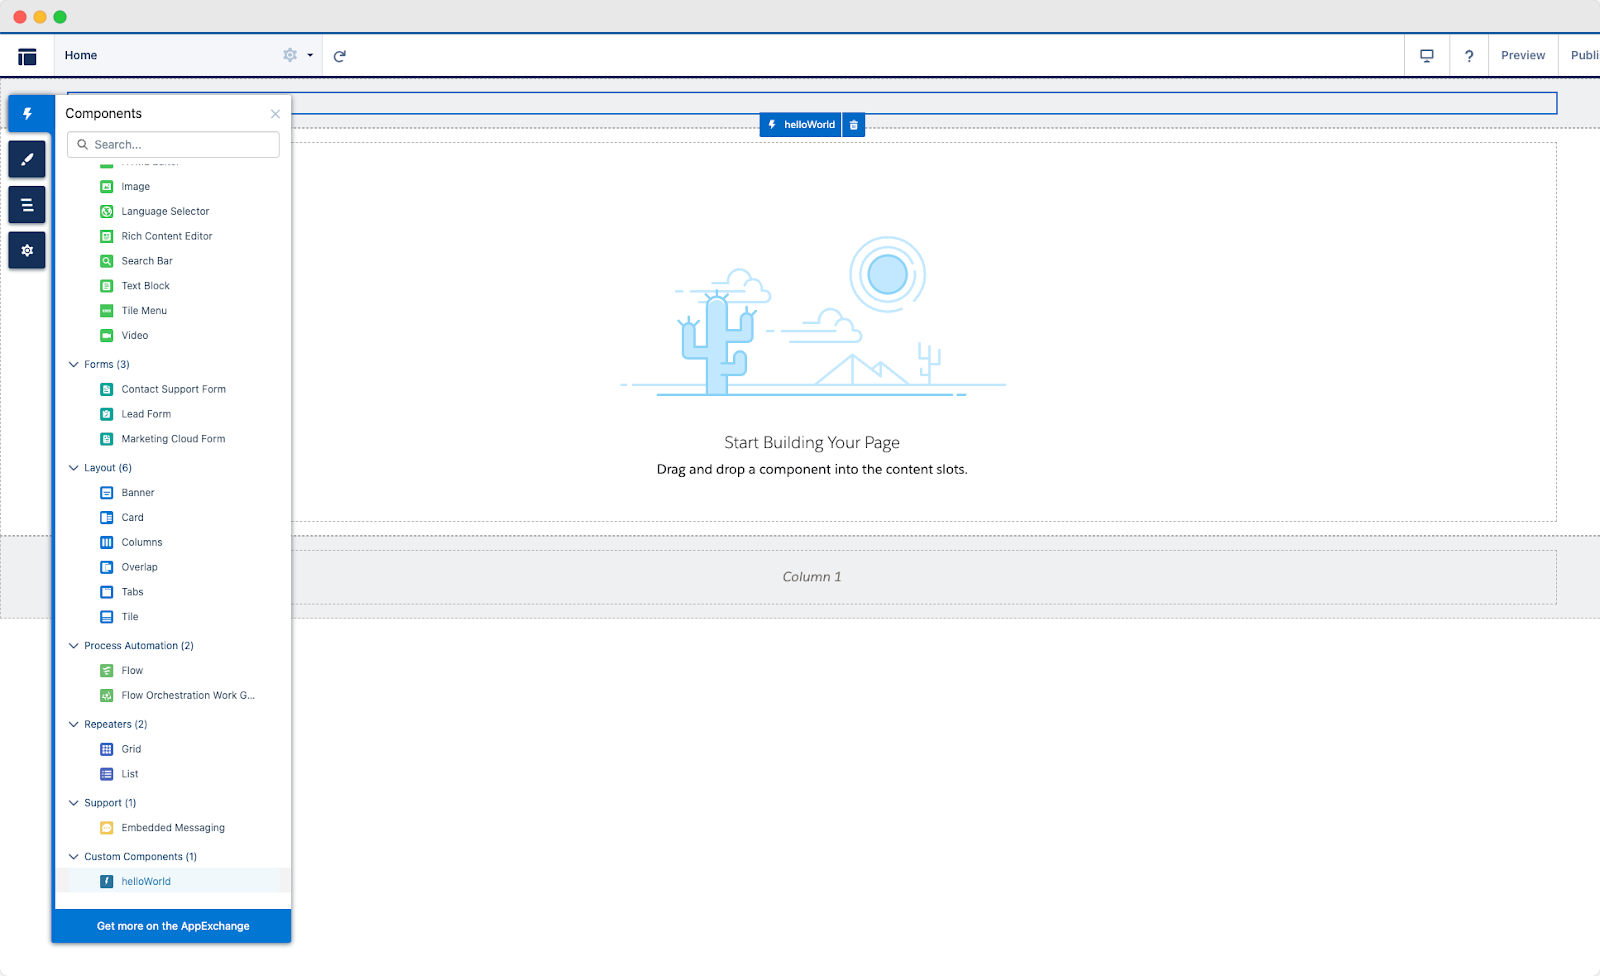
To provide steps for a site using the LWR framework, we use the "Build your own (LWR)" template when creating a new site. Upon creation, we customize this new site by adding a placeholder Lightning Web Component (LWC).
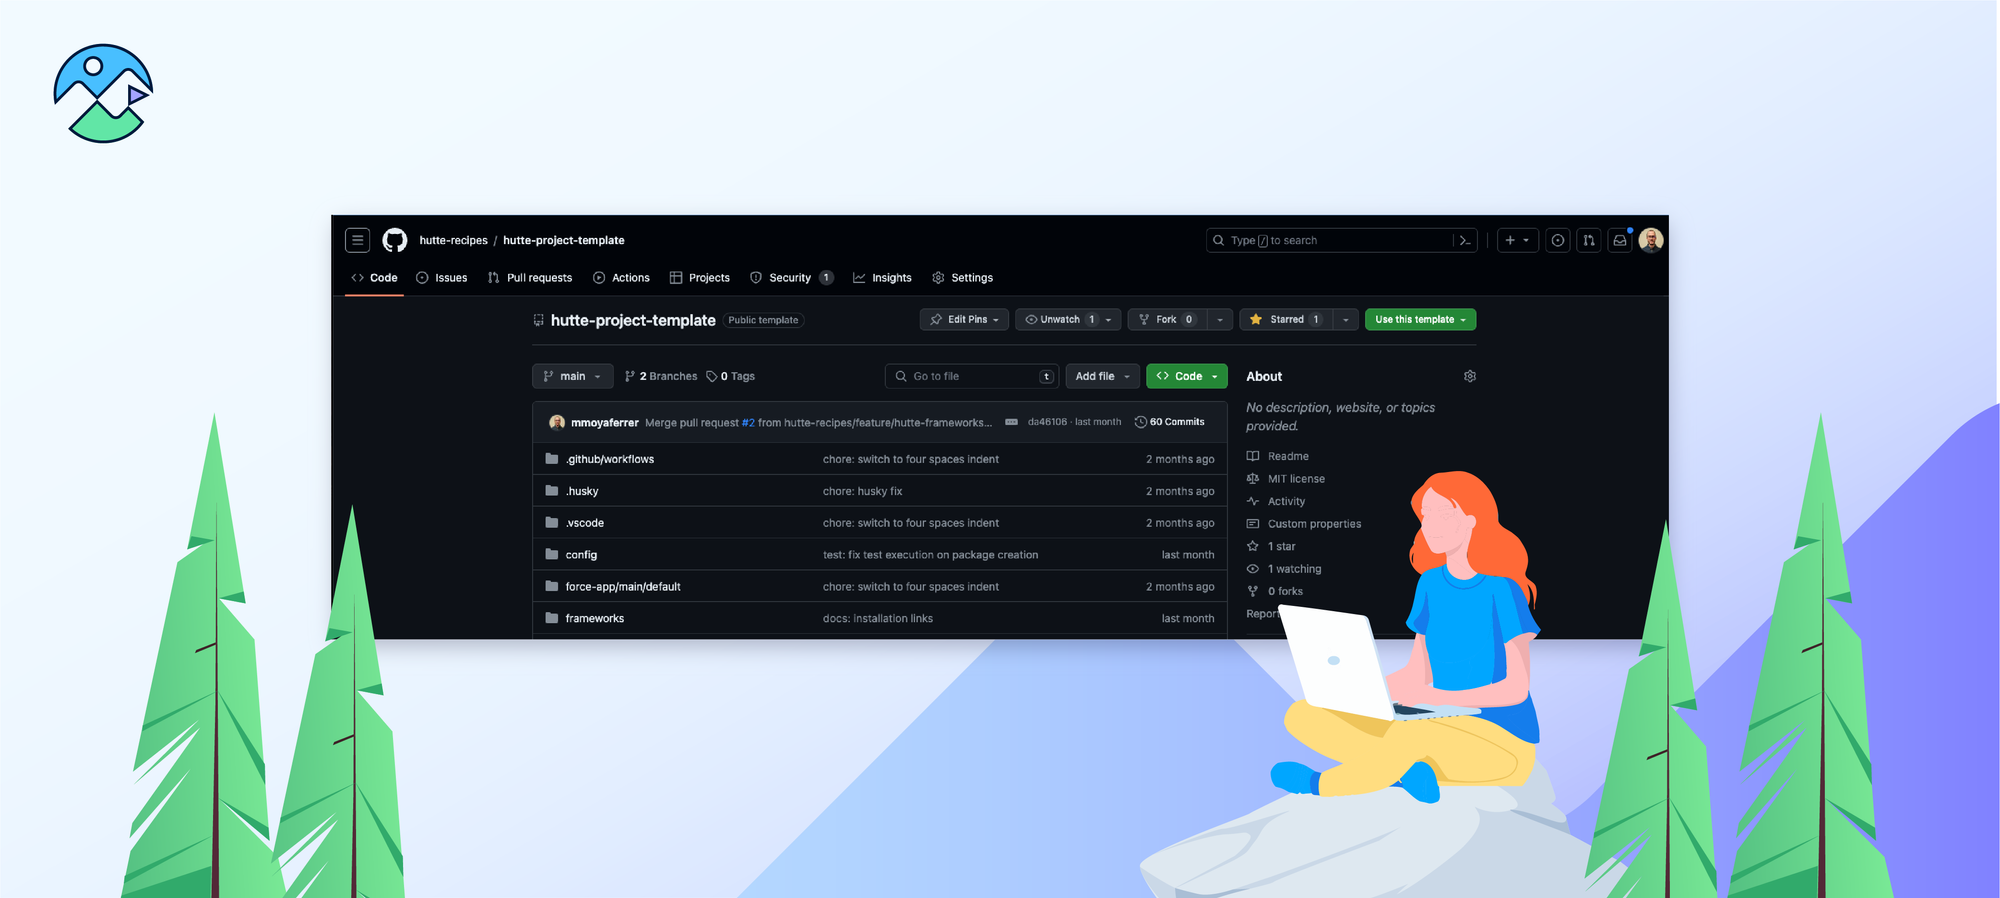
In your Hutte Project, create a new Hutte feature, assigning the org where you will create the Experience Cloud site. It's important to create the Hutte feature before making changes so that we can track the new changes, making the commit experience more straightforward and quicker.
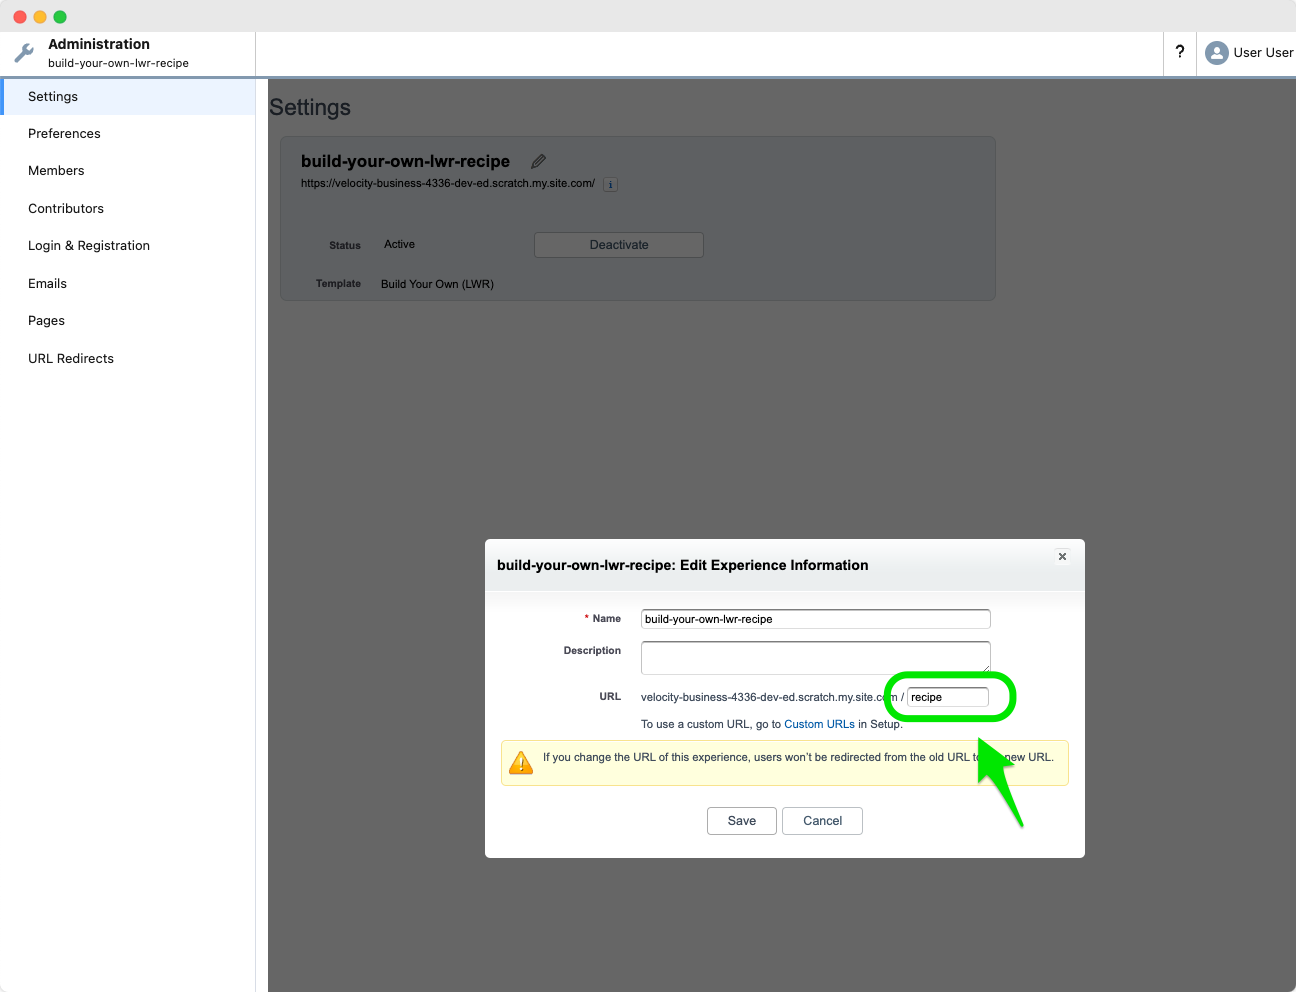
To avoid future deployment issues, it's recommended that you add a "urlPathPrefix" to the site URL. You can do this by going to "Administration" and "Settings."
Once we have completed the prerequisites, created the site, configured GitHub, and enabled “Digital Experiences” in the destination org, we can proceed with tracking the site changes in Git and deploying them. Here are the steps:
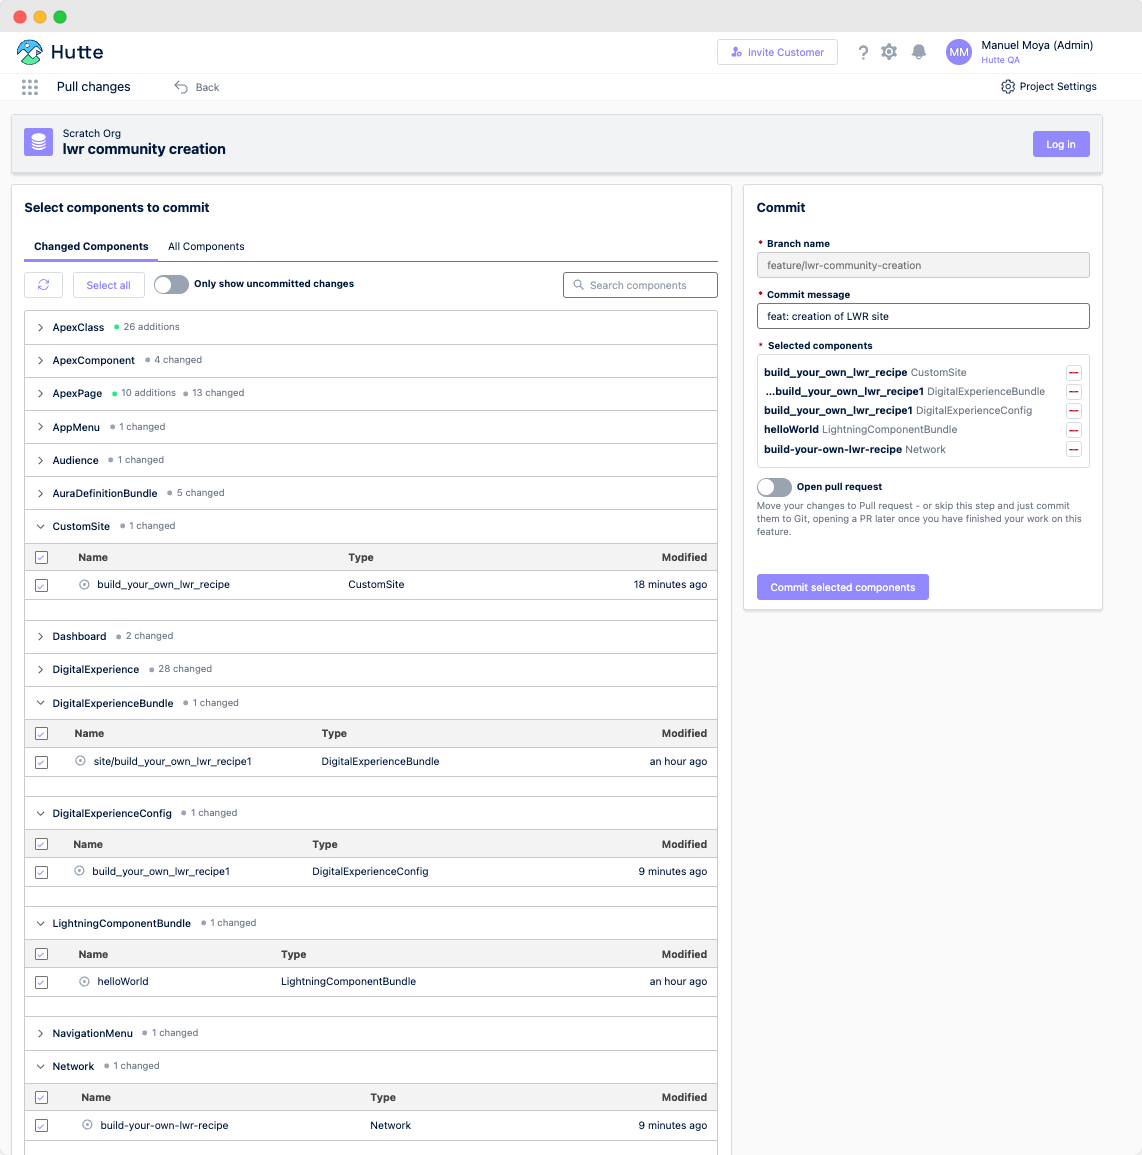
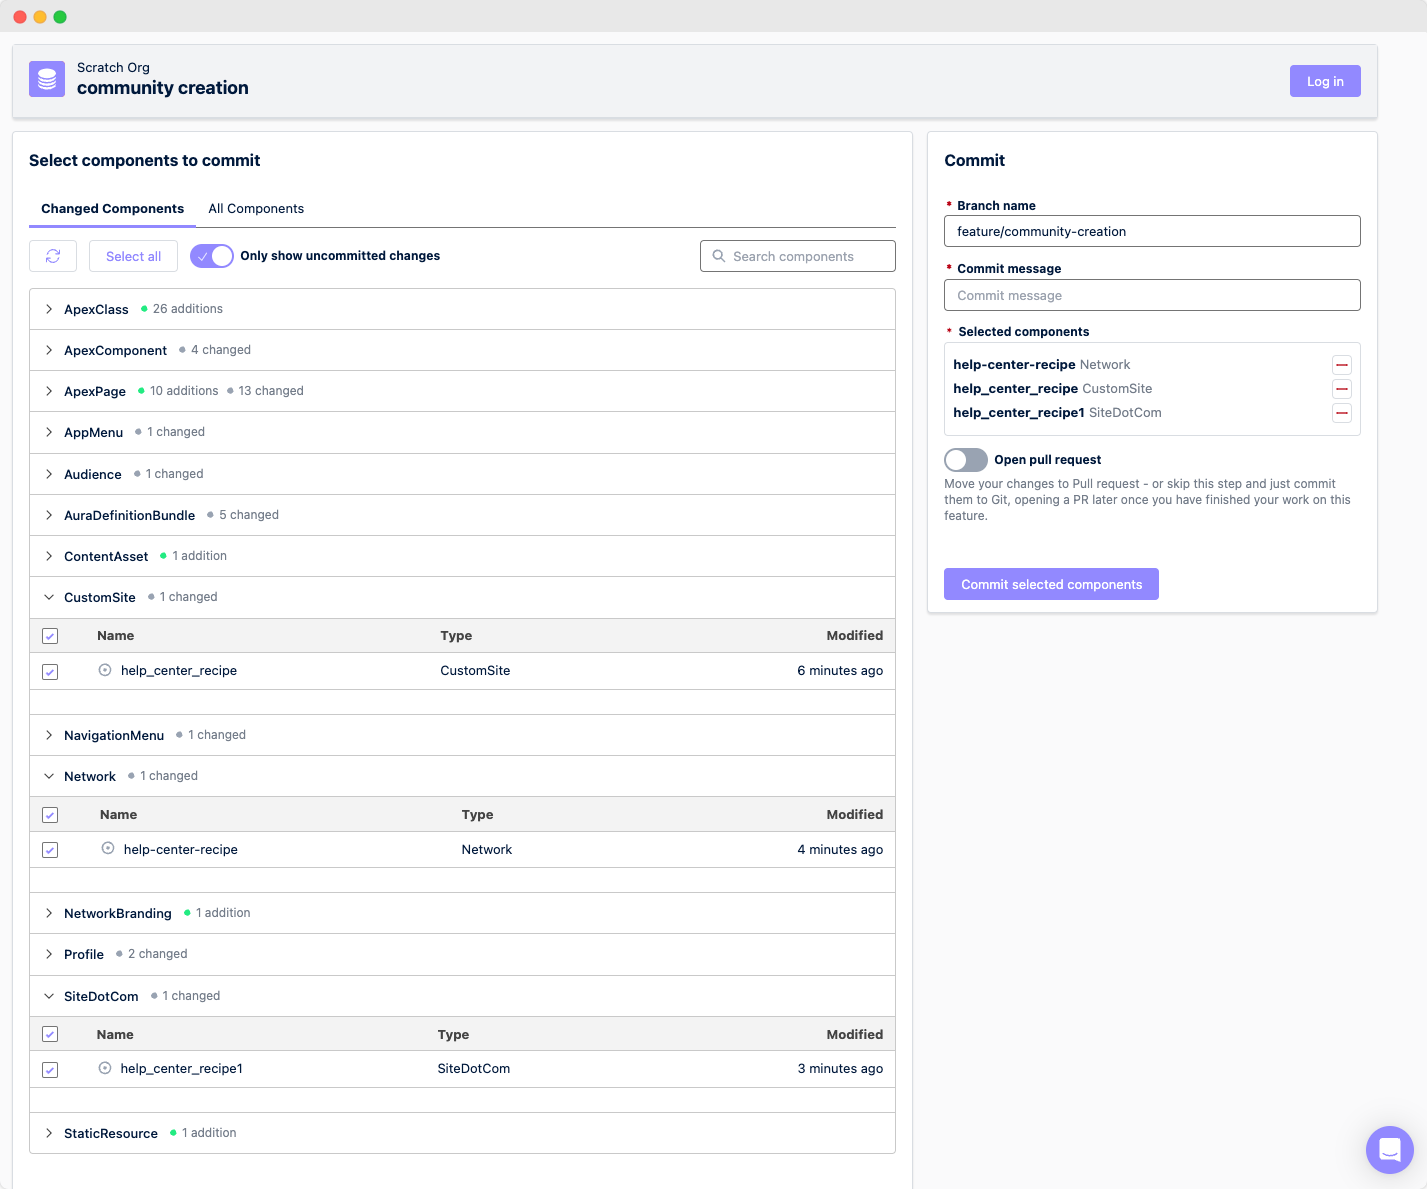
Commit the baseline metadata and the custom LWC: Navigate to the previously created Hutte feature and click "Pull Changes." A long list of changes will be displayed, which is expected since Salesforce does a lot of behind-the-scenes work when creating a site. Only select the necessary changes as specified in the Salesforce docs by looking at the "ENHANCED LWR SITE" column of the table. Include the LWC that was previously deployed and added to the site page. All other metadata will be automatically generated in the destination org upon deployment – we won't need to deploy them.
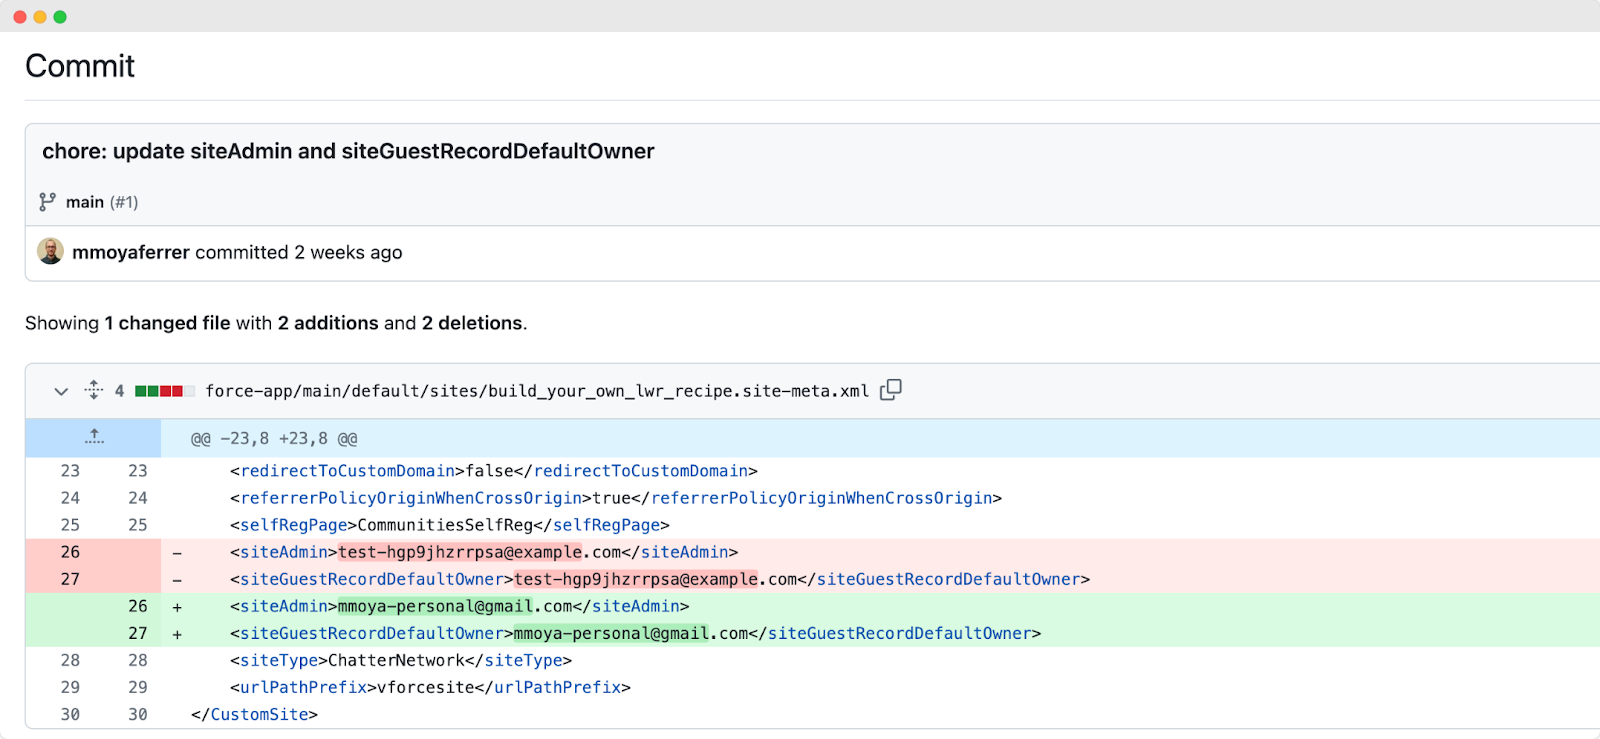
Replace "siteAdmin" and "siteGuestRecordDefaultOwner:" Change these fields in GitHub to use the username of the site admin in the destination environment.
⬇️
Author's note: This task requires some Git skills.
Troubleshooting error "The value for urlPathPrefix in DigitalExperienceConfig isn't validerror:" If you encounter this error during the next deployment, we recommend adding a "urlPathPrefix," which will solve the problem.
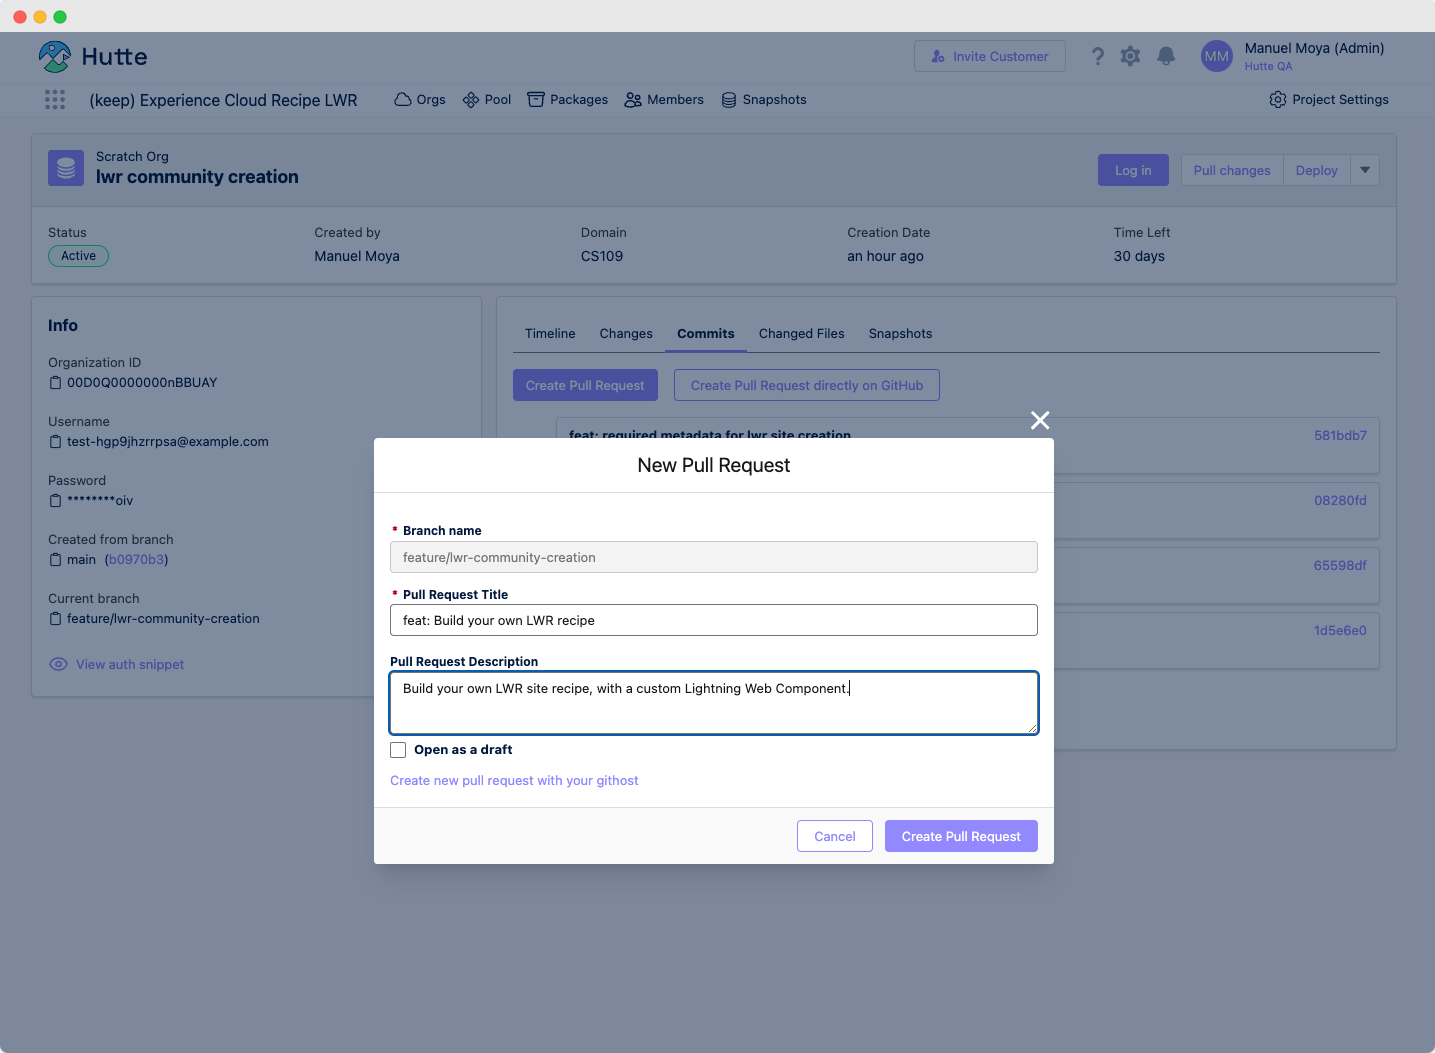
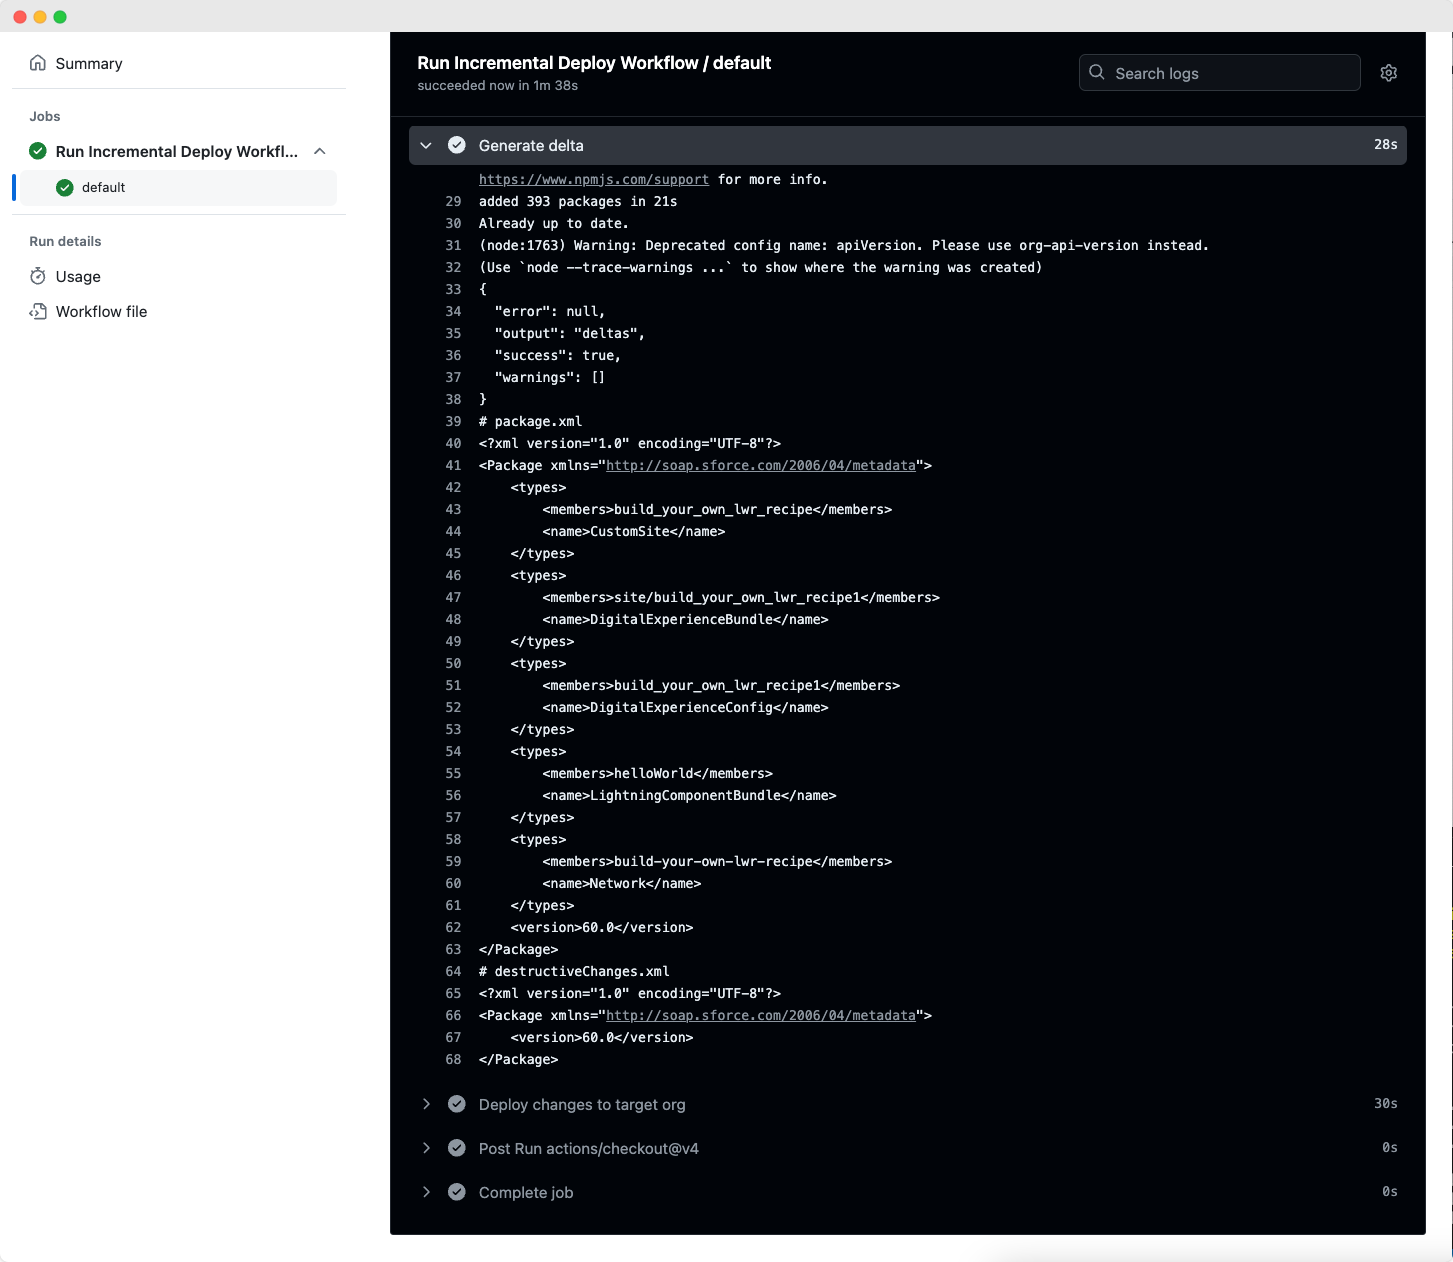
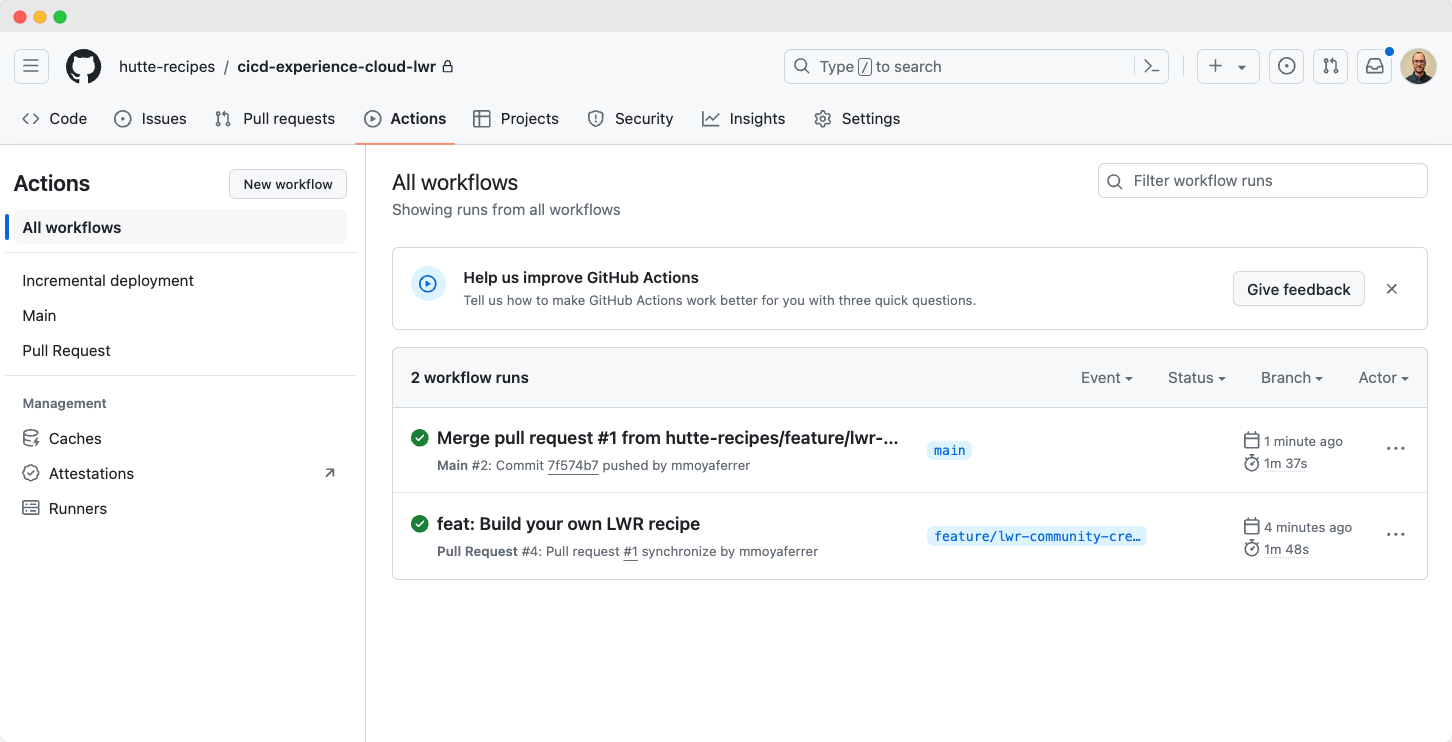
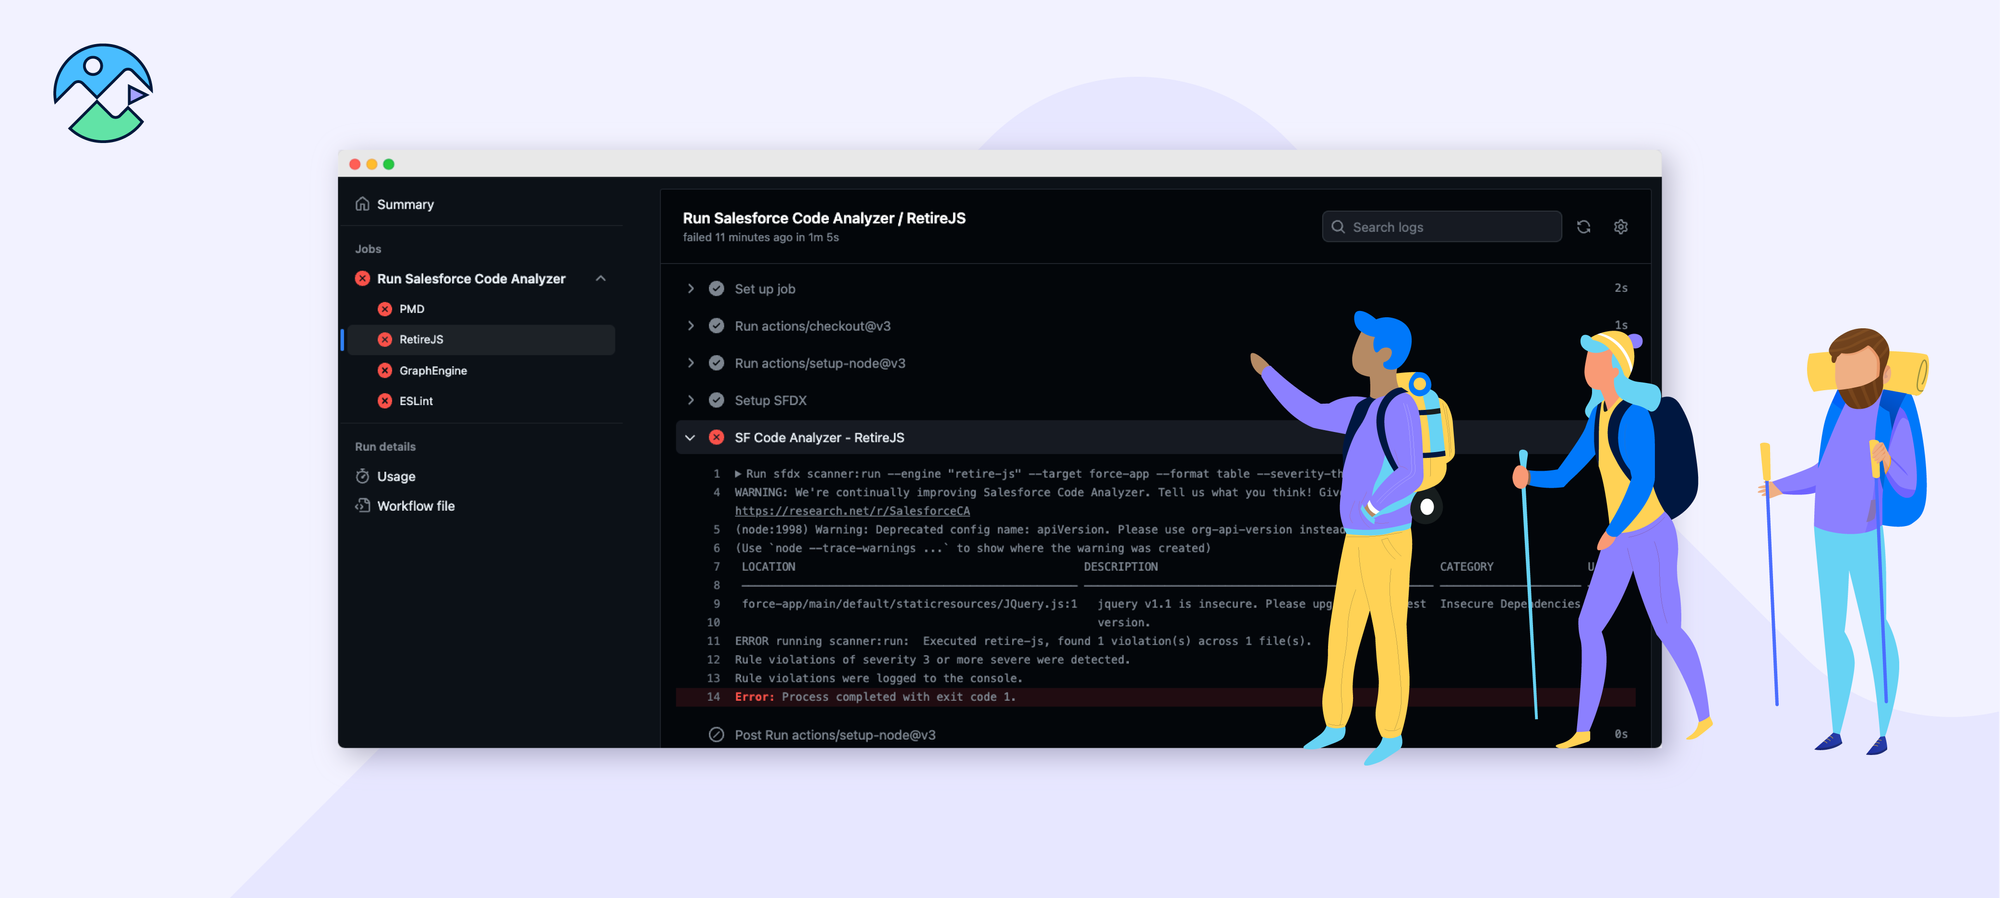
Create a pull request through Hutte: Creating a GitHub pull request (which we can do from our UI) allows another person to review the changes. A deployment validation will automatically run as part of the GitHub Action from the "cicd-incremental-deployment" recipe. This action validates that the changes included in the pull request can be deployed to the destination org without issues, without actually deploying any changes. Finally, check the details of the GitHub Action run to see the logs of the metadata changes being validated.
Merge the pull request and automated deployment to the destination org: Upon successful validation and code review, merge the pull request. An automated GitHub Action will deploy the changes to the destination org.
After the GitHub Action is successful, verify the changes in the destination org.
To provide steps for a site using the Aura framework, we reference the Help Center template. The Help Center template uses the Aura framework, so the same guidelines in this recipe apply to any site using the Aura framework. This recipe also includes the “cicd-incremental-deployment” recipe to validate (in a pull request) and deploy the Experience Cloud sites.
Prerequisites
Experience Cloud site creation
In your Hutte Project, create a new Hutte feature, assigning the org where you will create the Experience Cloud site. It's important to create the Hutte feature before making changes so that we can track the new changes, making the commit experience more straightforward and quicker.
Createa Help Center site in your Development Org (Digital Experiences).
Add the “sample image”as a background to the hero component.
Once we have completed the prerequisites, created the site, configured GitHub, and enabled Digital Experiences in the destination org, we can proceed with tracking the site changes in Git and deploying them. Here are the steps:
Commit the baseline metadata: Navigate to the previously created Hutte feature and click "Pull Changes." A long list of changes will be displayed, which is expected since Salesforce does a lot of behind-the-scenes work when creating a site. Only select the necessary changes as specified in the Salesforce docs.
All other metadata will be automatically generated in the destination org upon deployment – we won't need to deploy them.
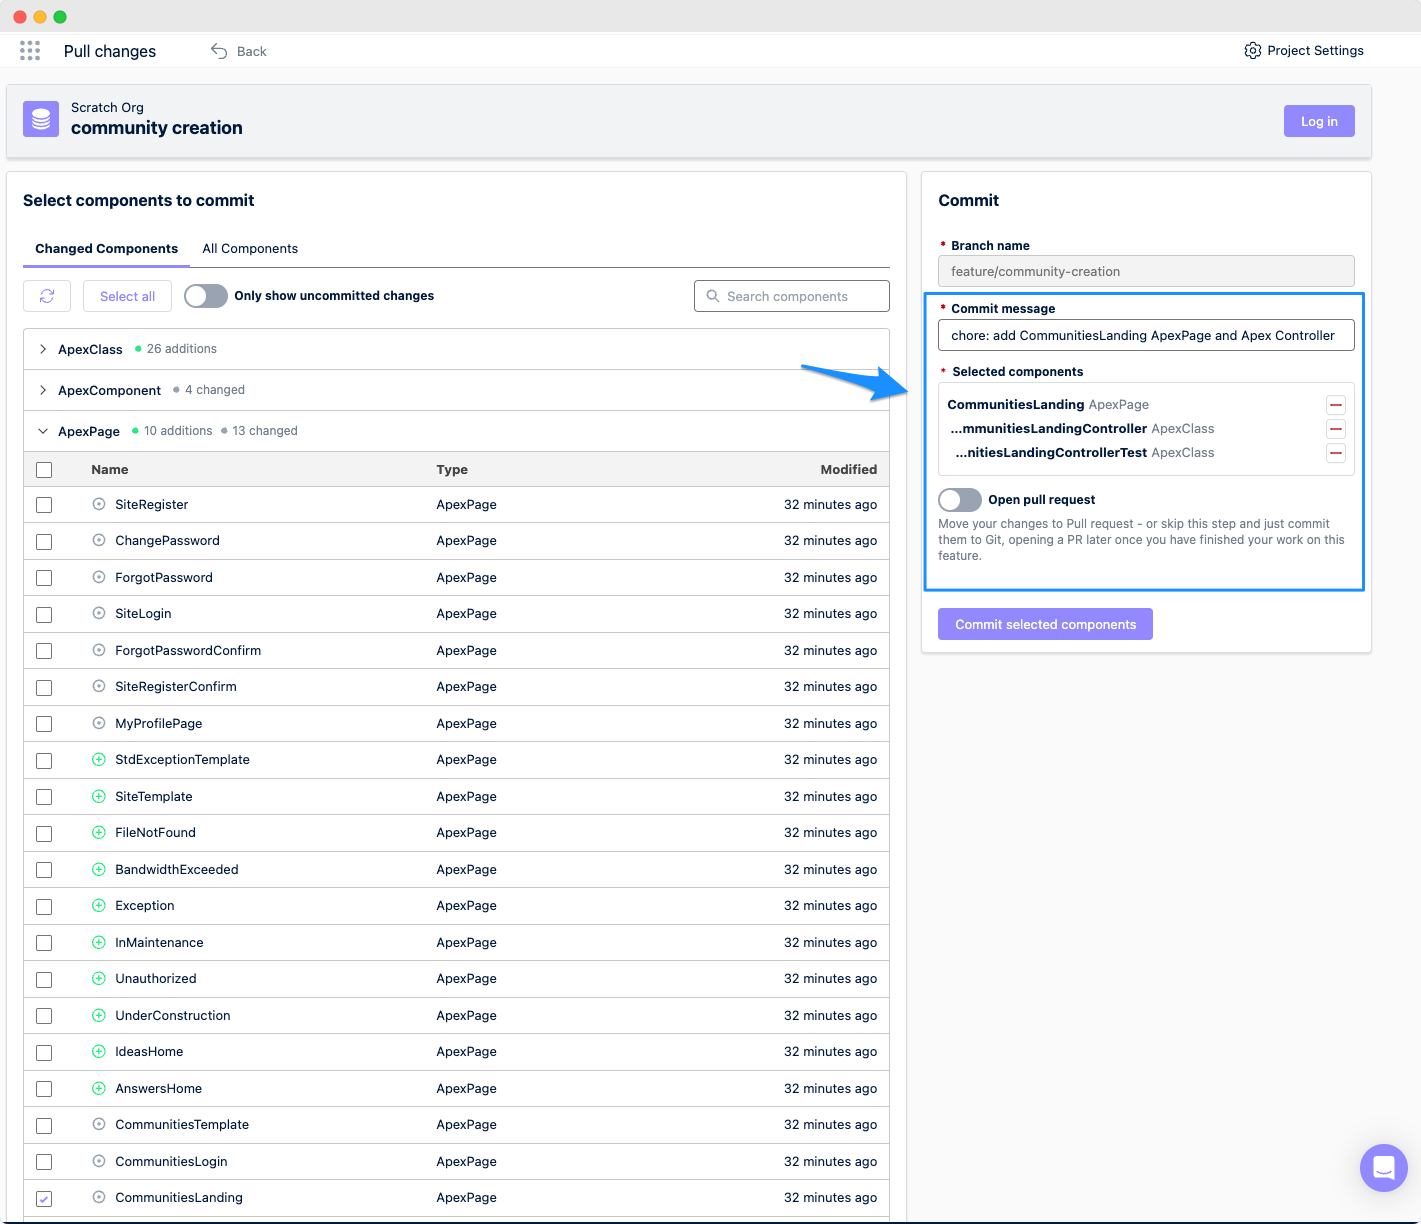
Commit extra metadata to avoid deployment issues: For Aura communities, including the Help Center community, commit the "SiteDotCom" instead of "ExperienceBundle." Commit the "CommunitiesLanding ApexPage," its Apex controller, and the respective Apex test class to avoid deployment issues.
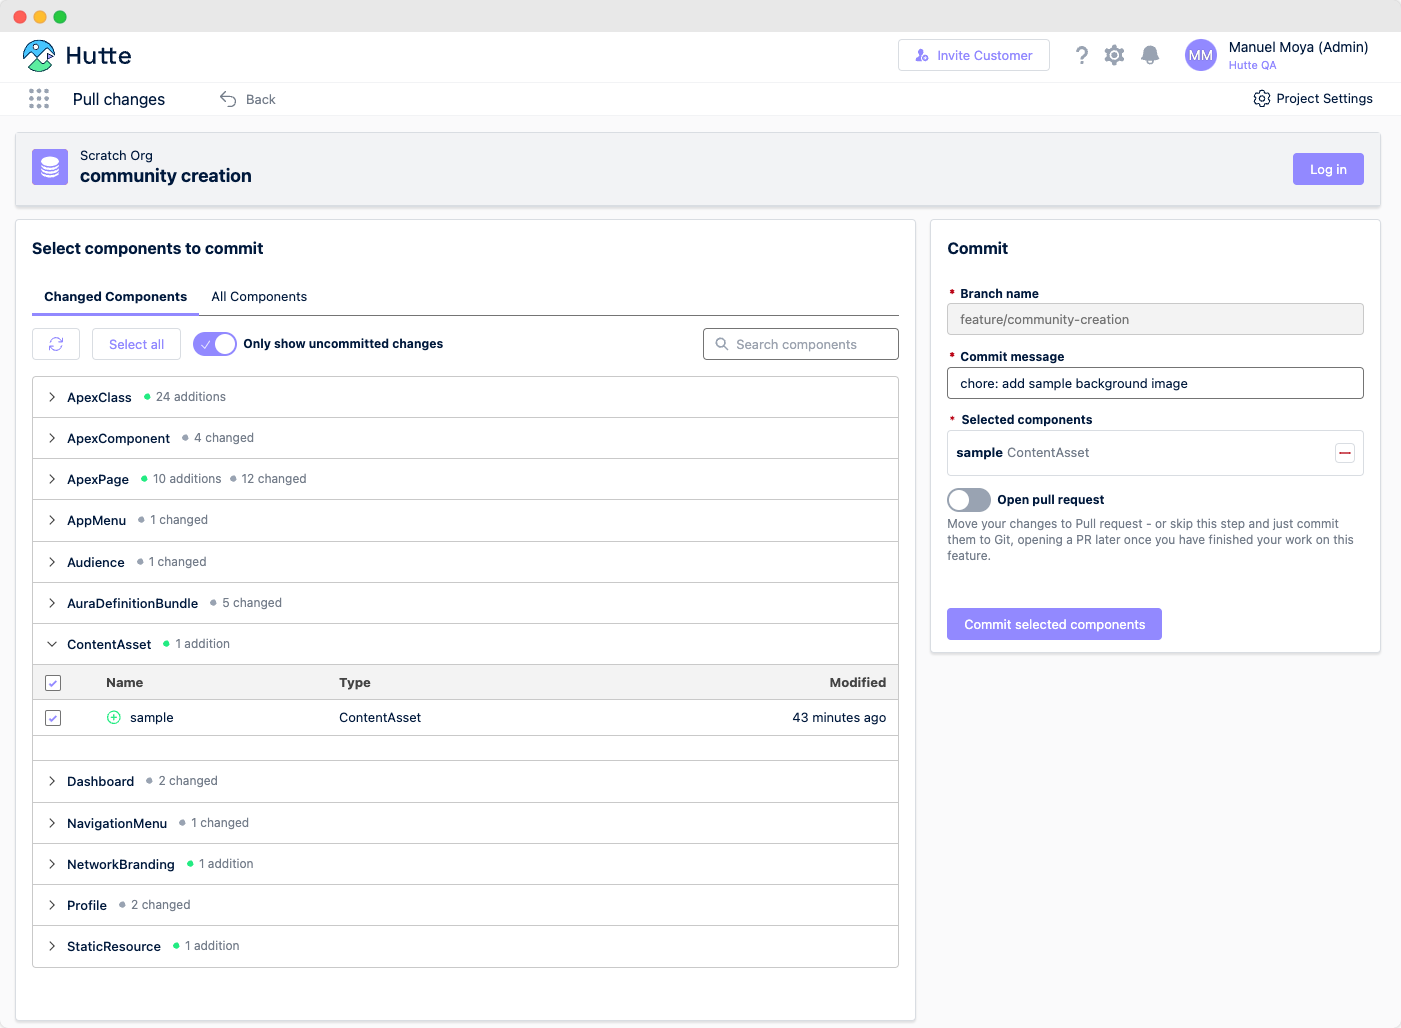
Commit the customizations: Apart from the baseline site, we added a sample image to the hero component as a background. Add the "ContentAsset" that includes this change.
Replace "siteAdmin" and "siteGuestRecordDefaultOwner:" Change these fields in GitHub to use the username of the site admin in the destination environment.
👇
Author's note: This task requires some Git skills.
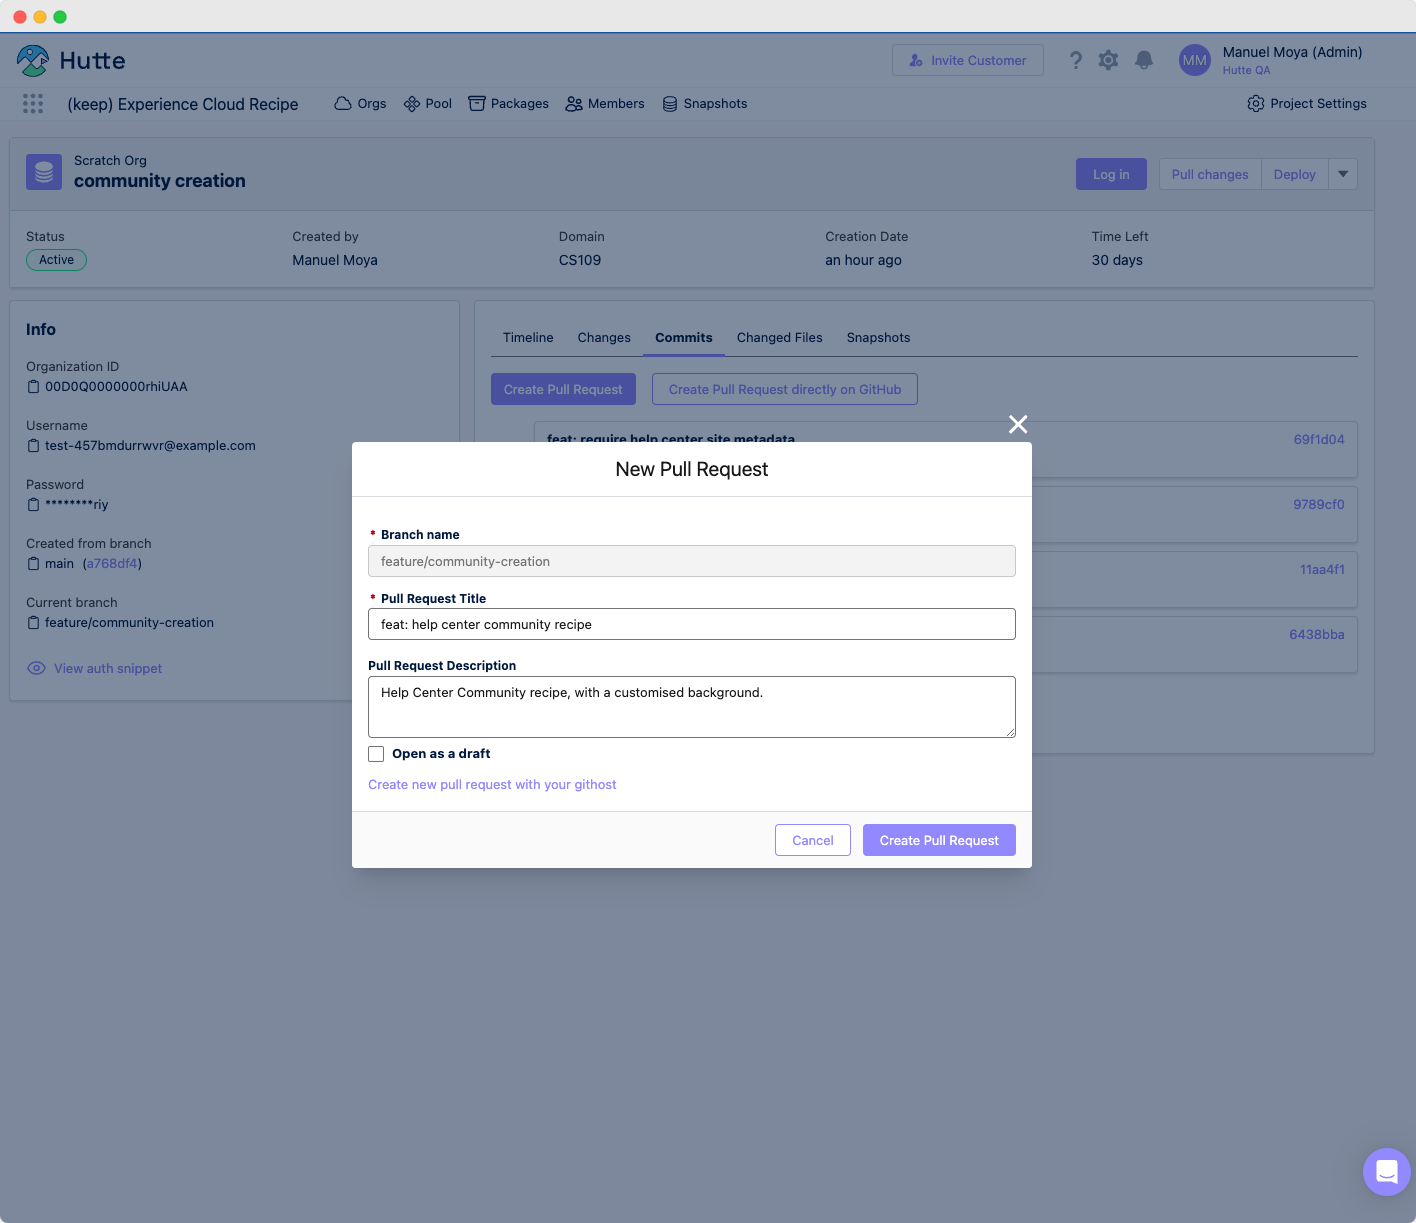
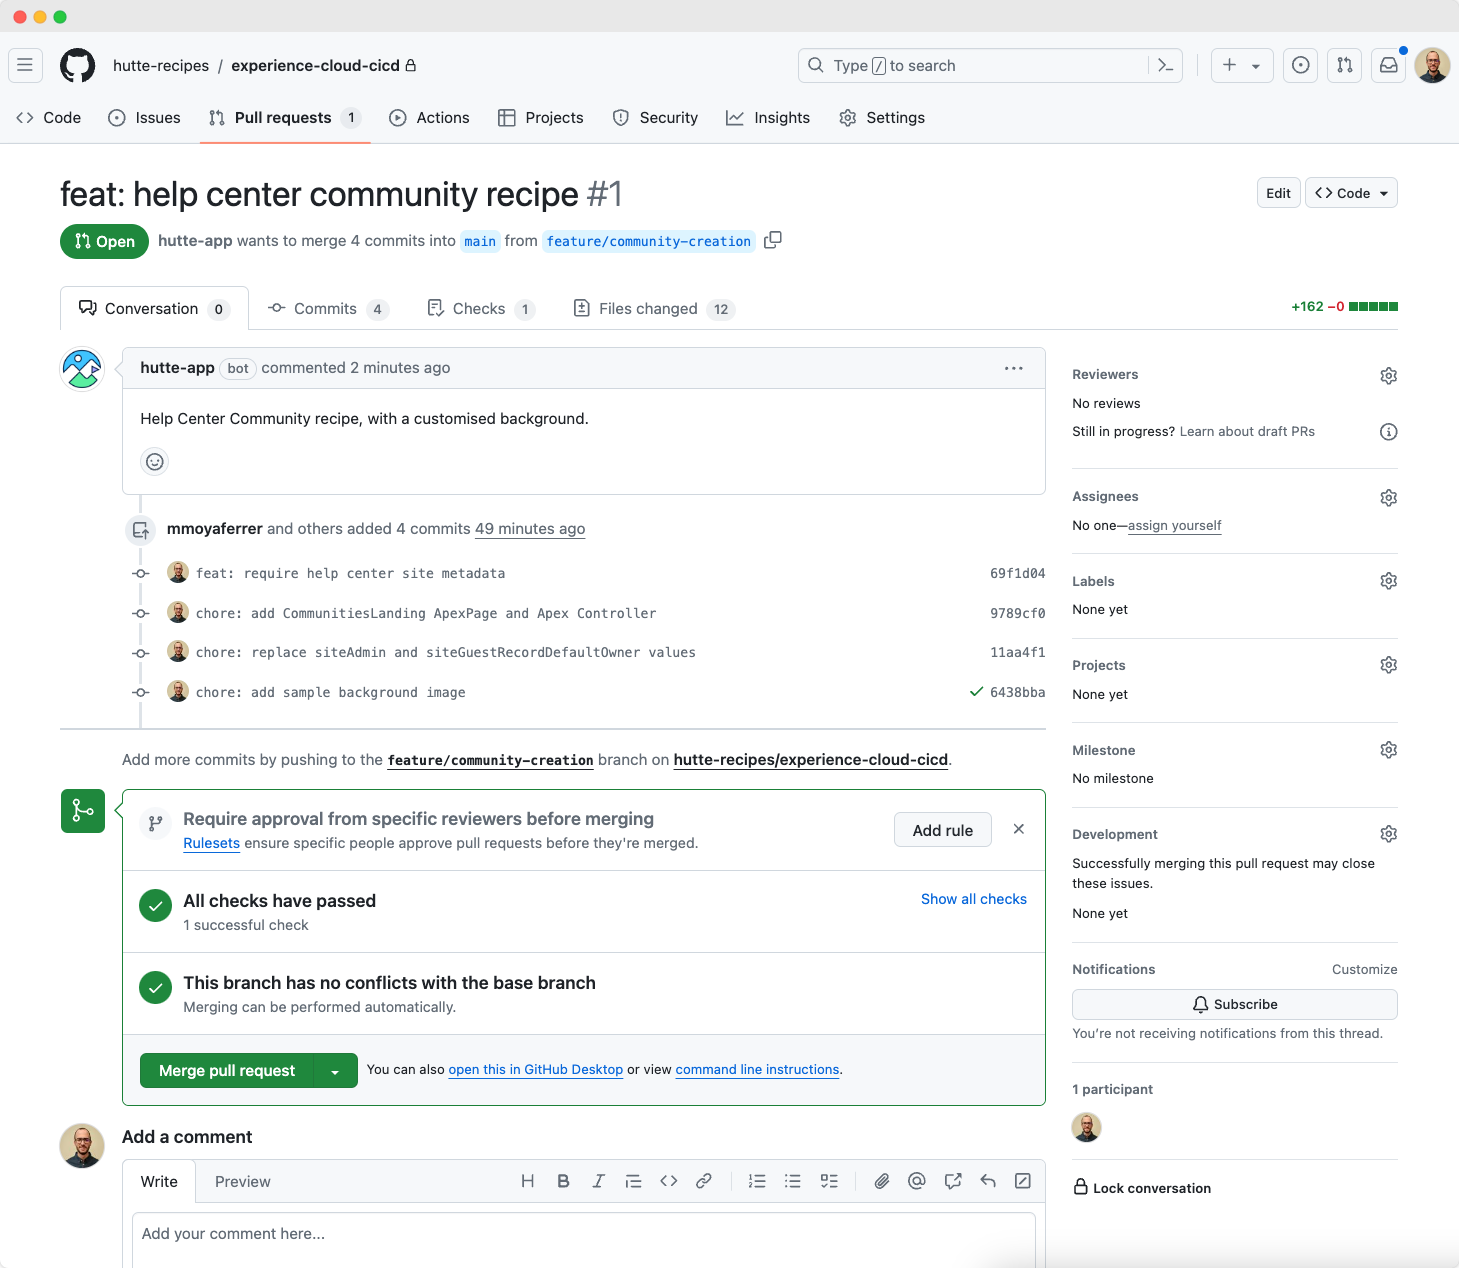
Create a pull request through Hutte: Creating a GitHub pull request (which we can do from our UI) allows another person to review the changes. A deployment validation will automatically run as part of the GitHub Action from the "cicd-incremental-deployment" recipe. This action validates that the changes included in the pull request can be deployed to the destination org without issues, without actually deploying any changes. Lastly, check the details of the GitHub Action run to see the logs of the metadata changes being validated.
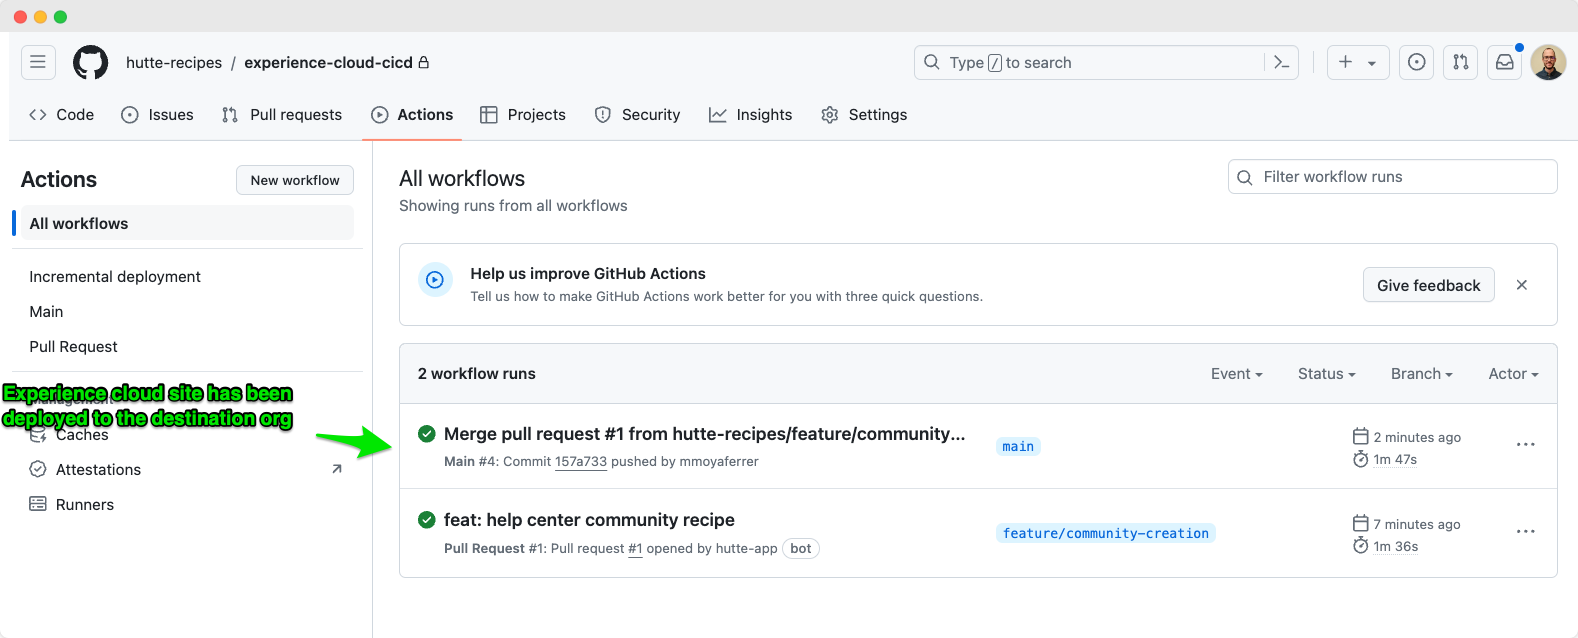
Merge the pull request and automated deployment to the destination org: Upon successful validation and code review, merge the pull request. An automated GitHub Action will deploy the changes to the destination org. After the GitHub Action is successful, verify the changes in the destination org.
Make your site an experience
Deploying Experience Cloud sites, whether using the LWR or Aura framework, can be streamlined and efficient with the right tools and processes.
✅
By leveraging Hutte's intuitive interface and robust GitHub integration, you can simplify the deployment process and ensure that your sites are deployed accurately and efficiently.
Follow these recipes to manage your Experience Cloud deployments confidently, and take advantage of Hutte's features to enhance your CI/CD workflows.
Manuel is a Technical Architect, Developer, and DevOps Engineer. He is a certified Salesforce Application and System Architect, 11x Salesforce certified in other areas, and 2x Copado certified.


